Showing posts with label easy cooking. Show all posts

Wednesday, April 30, 2014

Caramel Pecan Layered Gooey Brownies

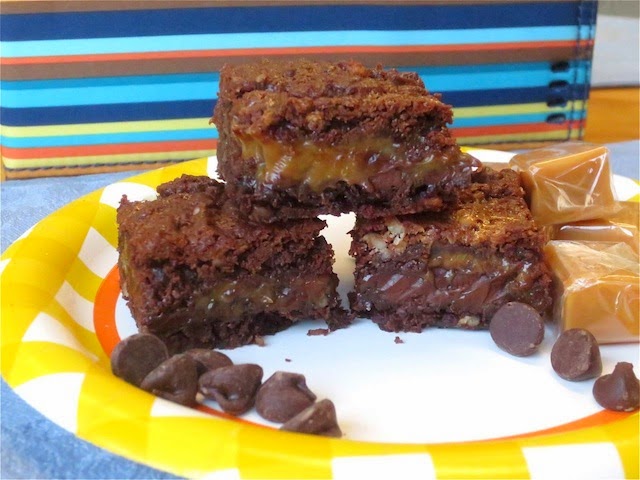
Caramel Pecan Layered Gooey Brownies
Photo by Pam Stephan
Brownies are good. Layered brownies are better! And when those layers include a thick slab of melted chocolate and another of caramel, you've got a great treat.

This recipe came to me via a coworker. He brought these to the office one day, and when I asked for the instructions, he told me he'd have to ask his mother! She was flattered to be asked, and sent along the recipe. I've since made it many times for parties and gatherings.

Brownies like this go together easily, because you start with a cake mix. The hardest part of making this recipe is unwrapping the caramels.


Caramel Pecan Layered Gooey Brownies


Ingredients:
1 chocolate cake mix
1 cup of chopped nuts, your choice (optional)
1 cup of evaporated milk (not sweetened condensed milk)
1/2 cup (1 stick) of butter or margarine, melted
35 caramels, unwrapped (11 oz. bag)
2 cups chocolate morsels (12 oz. bag)

Cook It:
Use an ungreased 9x13" pan.
Preheat the oven to 350°.
Unwrap all of the caramels, eat about 4-5 of them and save the rest!

In a large bowl, combine the cake mix and nuts (if using).
Measure out 2/3 cup of milk.
Add the milk and  melted butter to the cake mix, stir well.
You will not need to add egg!
Spread half of the batter in the 9x13" pan, bake at 350º for 15 minutes.

While that is baking, put 1/3 cup of milk in a small saucepan and add the caramels.
Over a low heat, melt the candies into the milk.
Stir frequently to prevent scorching and create a smooth sauce.
 
Remove the brownie from the oven, sprinkle the 2 cups of chocolate morsels over the baked batter.
Try to make an even layer of the chocolate.
Drizzle the melted caramel all across the chocolate.
By teaspoonfulls, drop remaining batter on the caramel sauce.
Don't worry about covering the caramel completely.

Bake for another 25 - 30 minutes, until center is set.
Cool well before slicing into squares.
Use a wet plastic knife for a clean cut.

Serve and enjoy the compliments!
Brownies are easily served in muffin papers.
Photo by Pam Stephan


Saturday, March 29, 2014

Tamale Dinner, Vegetarian Menu for Lent

Tamale dinner menu for Lent
Photo by Pam Stephan
Every Lenten season, we try to stick to a vegetarian or pescaterian (fish-based) diet. Since we live in Texas, the home of barbequed beef brisket, pork roast, and traditional TexMex food, this is no easy ride.

We have tried the Daniel Diet in previous years, but decided that while my Dad lives with us, we'll modify that to keep the peace. Dad is a steak and potatoes, cheeseburger and fries, BBQ brisket and beans kind of a guy. Going for 40 days without any kind of Real Meat would be very hard for him, even with dementia.

Fortunately, Dad loves fish (so long as it is not shrimp or oysters or squid or sushi.) Fry it, bake it, broil it, smother it in sauce, and Dad will put away the fish. So we have that option through Lent, but we crave variety. I like to be creative, and that has led to us trying many foods that we may have never known about before going on this adventure.

This Tamale Dinner menu is 100% vegetarian, but don't tell my Dad that. As long as it looks and tastes pretty close to traditional TexMex, we are all happy.

Menu:
  • Corn chips
  • Fresh guacamole
  • Traditional Style White Mountain Tamale 
  • Sweet Corn Tamale (tamal de elote)
  • Yellow Rice, Mahatma brand
Notes:
I use McCormick's Guacamole mix with 3 avocados.
The Traditional Tamal is drizzled with molé sauce.
Spoon some salsa and then sprinkle cheese shreds on the Corn Tamal.
Serve that yellow rice while it is hot!

Buen provecho!

Monday, March 3, 2014

Chai Spice Cookies, Cheater's Version

Chai Spice Cookies
Photo by Pam Stephan
The first time I tasted chai, we were in Karachi, Pakistan visiting some friends. Tea is a big deal in that culture, and my friend knew how much I loved to try strong hot tea. She put together some whole spices in a saucepan on the stove, added boiled water, and two thick slices of fresh ginger. When that was fragrant, she brought it to a boil, turned off the heat, and tossed in a couple of spoonfuls of dark and curly tea leaves. After a few minutes time spent steeping, milk went into the mix, then the whole brew was strained into cups. It was a delight for the nose, tongue, and eyes! I could not get enough chai tea during that visit.

These cookies use some of the same spices, plus candied ginger, which actually keeps the cookies moist and chewy. When buying the candied ginger, don't settle for dried-up chunks, find a moist variety that is rolled in sugar. And about the cardamom - I grind my own from the seeds, but that's just because I adore the high notes that their oil produces and can't resist playing with them. Store these cookies in a well-sealed container and they will ripen in flavor daily. That is, if they last beyond the first day!

Ingredients:
1 package Betty Crocker Molasses Cookie mix, 17.5 oz.
1 stick of butter, softened
1 egg
1 tbsp water
1/4 cup finely diced candied ginger 
1.5 tsp cinnamon
1 tsp ground ginger
1/2 tsp clove
1 tsp ground cardamom
1-2 tbsps molasses, if desired

Instructions:
Preheat your oven to 350F. Measure all the spices into a cup. Chop all the candied ginger into a pile. In a bowl, beat the butter, egg, and water together. If you're using extra molasses, add that to the bowl and mix well. Now add the cookie mix to the bowl, sprinkle the spices and ginger bits over all. Stir this together until smooth, with no dry lumps in the batter. The dough will be stiff. 

You can scoop out tablespoons of dough onto cookie sheets and bake right away. But what I do is to scrape all the dough into a plastic container, seal it well, and chill it overnight. This makes scooping the dough easier, plus chilled dough bakes up with that crinkly, chewy texture really well. So if you chill the dough, scoop it out with a tablespoon. I like to press one side of the dough into sugar, the place it sugar side up onto the cookie sheet and flatten the dough ball with a glass. 

Bake these darlings for 8 minutes, then cool them on a rack. Don't scrape them off the cookie sheet right away, because they can tear up. Wait about 2 minutes, then remove them and finish cooling. Or eat them if you just can't wait!

Chai Spice Cookies with Cardamom and Molasses
Photo by Pam Stephan
Enjoy!

Chai spices vary, so experiment by combining other ingredients such as: allspice, or even a 1/4 tsp black pepper (finely ground).

Monday, February 17, 2014

Chocolate Raspberry Bundt Cake, Made Easy

Chocolate Raspberry Bundt Cake
Photo by Pam Stephan

We like to cook, eat, and share. Dad and I go to Senior Centers and sometimes that involves potluck lunches! Our fave thing to do is to whip up a goodie and take it along. That way we get to have an activity at home and taste-test it with friends. That's a win-win all over the place.

But since Dad has dementia and has a short attention span, cooking has to be fast and easy. So we use as many shortcuts as we can get away with.

Here you go - an easy version of a beautiful and tasty Chocolate Raspberry Bundt Cake.

Ingredients:
1 box of chocolate cake mix, the best you can find
1 box of instant chocolate pudding mix
1 jar of seedless raspberry jam
1/2 cup cooking oil
2 or 3 eggs - use your judgement
1/2 cup milk

Instructions:
Preheat your oven as instructed on the cake mix box.
Use spray-on shortening/flour to coat the inside of a Bundt cake pan.
In a large mixing bowl, combine well the cake mix and pudding mix.
In another bowl, beat the oil, eggs, and milk together - then beat in the raspberry jam.
Combine wet ingredients with dry ingredients and mix well until smooth.
Pour the batter into the cake pan and settle it equally around the pan.
Bake as directed on the cake mix box, and test it for done with a toothpick.
When cake has finished baking, allow it to cool with the pan inverted over a large plate.
It should slide out intact.

Decorate:
1 bottle of Duncan Hines Amazing Glaze Vanilla
Red M&M's - or other colors of your choice
1/4 cup mini chocolate chips

Shake well the bottle of Amazing Glaze, microwave it for 35 seconds, and then drizzle this over the cooled cake. A hot cake will simply soak up the glaze and you'll never see it again so please wait before glazing. The final effect is worth it! Use a pill splitter to divide the M&M candies. Scatter those over the glaze. Finally, sprinkle the mini chocolate chips over the whole cake (or just over the highest part) and let it all stick together.

Slip this beauty into your cake keeper and head for the nearest party or Senior Center. You will be greeted with compliments! 

It is even better when served in a bowl with a scoop of vanilla ice cream.